

Thursday, April 12, 2012
How To Setup CYBERGATE.. For hacking victims computer | next generation keylogger/Rat Tool
Do you like this story?
How To setup? Cybergate RAT 1.07.5 to hack victims computer facebook/twitter..?? next gen keylogger/Rat Tool
Cybergate 1.07.5 SetUp - Download Cybergate RAT:
Download Here
The AV Detection Is False Positives,in some av Don't Worry :D xD !
STEPS:
[X] Setting Up An No-IP
Cybergate 1.07.5 SetUp - Download Cybergate RAT:
Download Here
The AV Detection Is False Positives,in some av Don't Worry :D xD !
STEPS:
[X] Setting Up An No-IP
[X] Spreading Tips
[X] Port Forwarding
Setting Up The No-IP & Client
1. Start Off By Going To; No-IP.com And Register. If You Have An Account There Already, Then Just Log In.
2. Once You've Logged In, Press "Add Host"
3. Now It's Time To Choose Your Host Name
Hostname: Your HostName, EG:
YourHostName.no-ip.biz
Host Type: DNS Host (A)
Dont Care About The Rest, Once You've Choosen Your Host Name, Press "Create Host" In The Lower Right Bottom.
The Host Is Now Finished! Lets Move On To The No-IP Client.
1. The No-IP Client You Downloaded In The Beginning, Extract It To Your Desktop & Install It.
2. Now When You've Installed It, Open It Up & Log In With Your No-ip Username & Password.
3. When You're Logged In Press "Select Hosts" And Then Check That Little Box With Your Hostname.
Note: Always Have No-IP Open When You Have Cybergate Open!
There! Your No-IP Host & Your No-IP Duc Is Now Sat Up!
Setting Up Cybergate 1.07.5
1. Extract The Cybergate File You Downloaded In The Beginning To Your Desktop! Once Extracted, Open It & Wait 20 Seconds For The Agreement To Pass! :)
2. When It's Open, Press: Control Center -> Start.
3. Press: Control Center -> Options -> Select Listening Ports
4. Once You've Pressed The "Select Listening Ports" This Window Should Appear:
5. Firstly, Write "100" In That Little Box And Press The Blue Arrow. Then It Should Appear Under "Active Ports"
Active Ports: The Port You Will Forward Later!
Connections Limit: The Max Amount Of Victims You Can Have.
Connection PW: The Connection Password. Use "123456"
[V] Show Password: (Shows Password)
Once This Is Done, Press "Save"
6. Now We'll Go To The: Control Center -> Build -> Create Server.
User: First, Press "New" And Name It To: "Plutonium". Once Done, Press "OK"
Now Just Double Click On "Plutonium" Or Press "Plutonium" And Then Press "Forward"
7. Now We're In The "Connection" Tab.
First, Press "127.0.0.1 - 999" And Then Press Delete.
Now Press "Add" And Write Your Hostname In It + :100.
Like This:
Quote:YourHostName.No-ip.biz:100
Change The Identification To: Cyber
Change The PW To: 123456
**Note, If You Want To Try The Server On Yourself, Then Delete Both:
- 127.0.0.1:999
- YourHostName.No-ip.biz
And Replace Them With; 127.0.0.1:100 Since 127.0.0.1 Means "Local Computer & LAN Internet"
Make The DNS/HostName Server First Though
DNS: Your Host Name, EG:
Quote:YourHostName.no-ip.biz
Port: The Port You Will Forward Later.
Identification: The Victim Name
PW: The Password You Wrote In The Options, "123456"
8. Once You're Done With Theese, You'll Move On To The "Installation" Tab.

9. Have The Same Settings As I Do, And Follow The Instructions In The Image
Install Directory: Where The Server Installs,
%System%
%Windows%
%Root%
%Program Files%
%Other%
Use The "System"
Boot: This Is The "Startup" Option. Have Everything Checked & Press "Random" 5 Times And It Will Startup On Your Victim Everytime They Start Their Computer!
Directory: Where The Virus Folder Installs
File Name: What The File Will Be Inside The Folder.
Inject Into. What Process It Injects into, Use Svchost.exe!
[V] Persistance: Keeps Trying To Inject Until Succed.
[V] Hide File: Hides The File, (Not FUD Though!)
[V] CCD: Changes The Creation Date From 16th July To 4 September 2005.
Mutex: Mutex Of The Server, Just Press Random A Couple Of Times!
There We Go, You've Now Completed The "Installation" Tab!
Skip The Message & Keylogger Since They Are Pre-Set Already!
10. You Should Now Have Trumbled Into The "Antis" Tab, Have Everything Checked! (Except SANDBOXIE If You Are Gonna TRY IT ON YOURSELF)
Ok, The Final Tab.. "Creation Of The Server". Have Every Setting As Me!
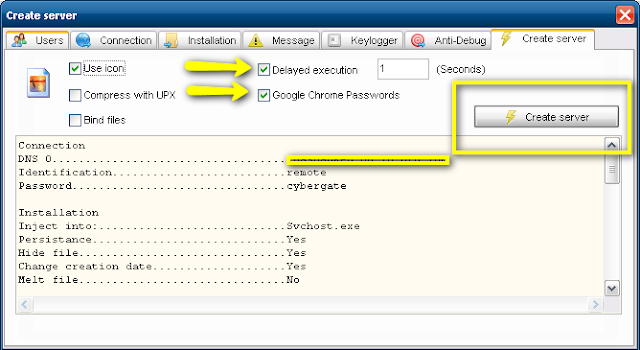
[V] Use Icon: Yes Buy i have notice some crypter corrupt the server if you use an icon
[V] Delayed Execution: (How Many Seconds It Takes Until Your Server Injects And They Pop Up In Your RAT)
[V] Google Chrome PW: Yes, Steals Their GC Passwords :)
[X] Bind Files: No, Get An Real Binder Instead! (Have Your Server Crypted Though First!)
[X] Compress With UPX: Makes The Server Smaller But More AV's Detects It!
There! Your RAT Is Now Fully Sat Up. You Do Only Need To PORT FORWARD First To Make It Work! Follow This Tutorial: Plutoniums Port Forward Tutorial! And Everything Should Work Out Well!
Quick Troubleshooting If Your RAT Doesent Work:
Non-Connecting RATs
Make Sure That
1. You are properly port-forwarded if using a router.
2. You have the No-IP Client installed and running.
3. Your DNS entries are correctly spelled when building your server.
4. The password in Listening Ports and the password your server uses are identical.
5. You are Listening on the correct ports.
6. Your Firewall is letting connections through on the port you're listening on.
7. Your server is added to excluded files in your Antivirus and Firewall.
Spreading Tips: (Once Your Server Is Crypted & Ready: How To Spread Your Bot) Use Mediafire,DropBoX,Box,Ziddu etc.. File upload sites for spreading your virus here is a tut: Click here
Also, Some Tips On HOW To Not Get Caught And Reported To The FBI. ALWAYS USE AN VPN OR PROXY.
A Proxy//VPN Is Something That Replaces Your IP With Another Somewhere Throughout The World.
Get Your VPN / Proxy From Here:
BEST VPN/PROXY SWITCHER


